I have a post lamp in my front yard which up until Saturday was in the grass by the front walk, with nothing around it. Not any more, now it is surrounded by a little flower bed. Here’s how I made my little flower bed…
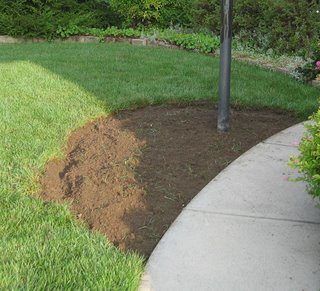
 First, I removed all the sod. That’s the first picture. I actually started Friday night about an hour before it got dark, but didn’t have the presence of mind to take a ‘before’ picture showing the lamp post in the grass.
To dig the sod up, I used a half moon edging shovel to slice through the sod I planned to cut out, sort of like how you would pre-cut a pan of brownies. Then using my Japanese hand-digging hoe, I got down on my hands and knees and dug out the sod, a section at a time. I am grateful I can still get down on my hands and knees, and more importantly, get back up. I only use this method for removing sod from small beds. If am going to create a big flower bed, I use a roto-tiller to break through all the sod.
Underneath the sod, I found some very nice top soil, so I didn’t have to do anything to amend the soil. The reason there was good top soil there, and not a bunch clay and rocks, is because when my builder said 9 years ago “I’m going to have to bring in some fill dirt”, I asked him what he meant by “fill dirt”. Turns out he meant the stuff that gets dug up when someone digs a basement. Uh, no, we couldn’t have that! I could just imagine how horrible that would be to dig in. So, I told him to skip the “fill dirt” and bring in some top soil, and I explained what I meant by “top soil”. And thus it came to be that I have some nice top soil to plant in.
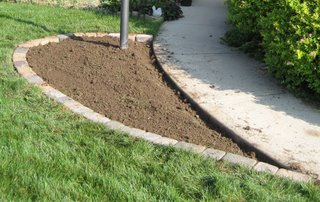
So, once I had removed the sod, and lightly hoed up the ground, I edged my new bed with some “cobble stone” pavers which I had left over from other projects. I have used this same type of paver as an edging along most of my shrub borders and flower beds. The 2nd picture shows the new bed all edged up.
Finally, I got to do some planting. The fun part! I decided that I would not plant anything too permanent in this bed, to allow me an opportunity to put more “seasonal” plantings there, so I planted some Dendranthema grandiflorum (formerly known as Chrysanthemum) that I bought on Friday. I had purchased two nice big pots of these mums on a whim because they were only $2.99, and each pot had four plants in it. By dividing them up before I planted them, I ended up getting 8 plants for the price of 2! For six dollars! (When you get something that cheap, don’t you feel like you should say “six bucks!”)?
Yes, I know that mums are perennials, and technically, I should consider them ‘permanent’, but I may move them out later to make room for some tulip bulbs. And yes, I know technically tulips are ‘permanent’ too, but around here, they aren’t too reliable in coming back each year, so some people treat them as annuals.
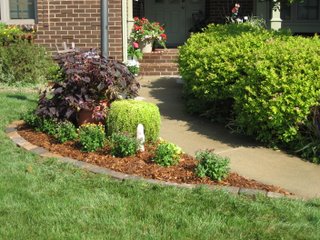
Then after I mulched the entire bed, I gathered up 3 containers of plants from the back patio and set them around the post, along with a little statue of St. Fiacre, patron saint of gardeners. The largest pot, which has a purple-leaved sweet potato vine in it, along with some Cleome ‘Linde Armstrong’ (which is beyond its peak) helped to provide some height next to the lamp post. I thought the container of light green sedum provided a nice contrast to the purple leaves of the sweet potato vine. And the other container, which is partially hidden behind the sweet potato vine container, has some low, spreading coleus in it.
I think I’m all done with my little flower bed, at least for now, except I may add some pansies, if I find some I like, and maybe later I’ll add a pumpkin or two for fall decoration. Altogether, between Friday night and Saturday morning, I think it took me about 4 hours to create this little flower bed.
Now, I just need to figure out what to do with those spirea, Spirea bumalda ‘Lime Mound’, on the right, that are crowding out the sidewalk.


Very nice!
By the way, someone dropped by my blog and said that the “dew” in my picture was actually “guttation” – liquid from the plant itself.
lovely bed.The pictures are very good with before and after.It looks really good too.I want to photograph a pumpkin for halloween like maria’s candle idea.Pansys are lovely plants too..
That’s neat. I love the new flower bed.
Did you put anything under the pavers or just lay them on the soil. I am about to put some down and am trying to decide upon preparation.
gary
I put nothing under them, and have never had any problems. Some people cut landscape fabric into strips and put that under them, others lay down some sand first. I’m not going for “perfection”, so I level them ‘by sight’ vs. use an actual level. If any get too out of place, I can adjust them.
I don’t know how it is with Indiana, but I have read that mums winter over much better when planted in the spring as opposed to the fall, so they just might be annuals in your case.
THe flower bed is great and I really like the idea of putting potted plants in it to add height- that makes it so easy to switch out between seasons. You might consider planting some clematis to grow on your lampost. I just planted some next to mine and can’t wait to see it grow and bloom. Or maybe some ornamental grass for height.